API keys are like “digital keys” that allow qPilot to communicate with your Binance sub-account securely.
Thanks to these keys, qPilot will be able to:
- Read your sub-account balance
- Execute trading operations automatically
- Replicate strategy operations
Why are they necessary?
- Without API keys, qPilot cannot connect to Binance.
- They are the “bridge” between the qPilot platform and your Binance sub-account.
- Each sub-account has its own independent API keys.
Important on Security: API KEYS ARE VERY IMPORTANT INFORMATION
- NEVER share them with anyone (except qPilot).
- Do not send them via email, WhatsApp, or social media.
- Save them in a safe place.
- Binance will show you the Secret Key ONLY ONCE.
- If you close the page without copying it, you will have to create new keys.
What You Need Before starting, prepare:
- The computer where you have Binance open
- The phone with Google Authenticator
- Access to your main email
Step 1: Access API Management
- Log in to your Binance account:
- Go to www.binance.com.
- Log in with your main account credentials.
- Enter the 2FA code.
- Open the side menu:
- Click on the profile icon at the top right and click on Dashboard.
- Go to “Sub Accounts”:
- In the side menu, click on “Sub Accounts”.
- Click on “API Management”:
- In the Sub Accounts page, look for the button or tab “API Management”.
- Click on this item. The page dedicated to managing sub-account API keys will open.
Step 2: Create a New API Key
- Click on “Create API”:
- At the top right of the page, you will find the “Create API” button.
- Click on the button. A window or new page will open.
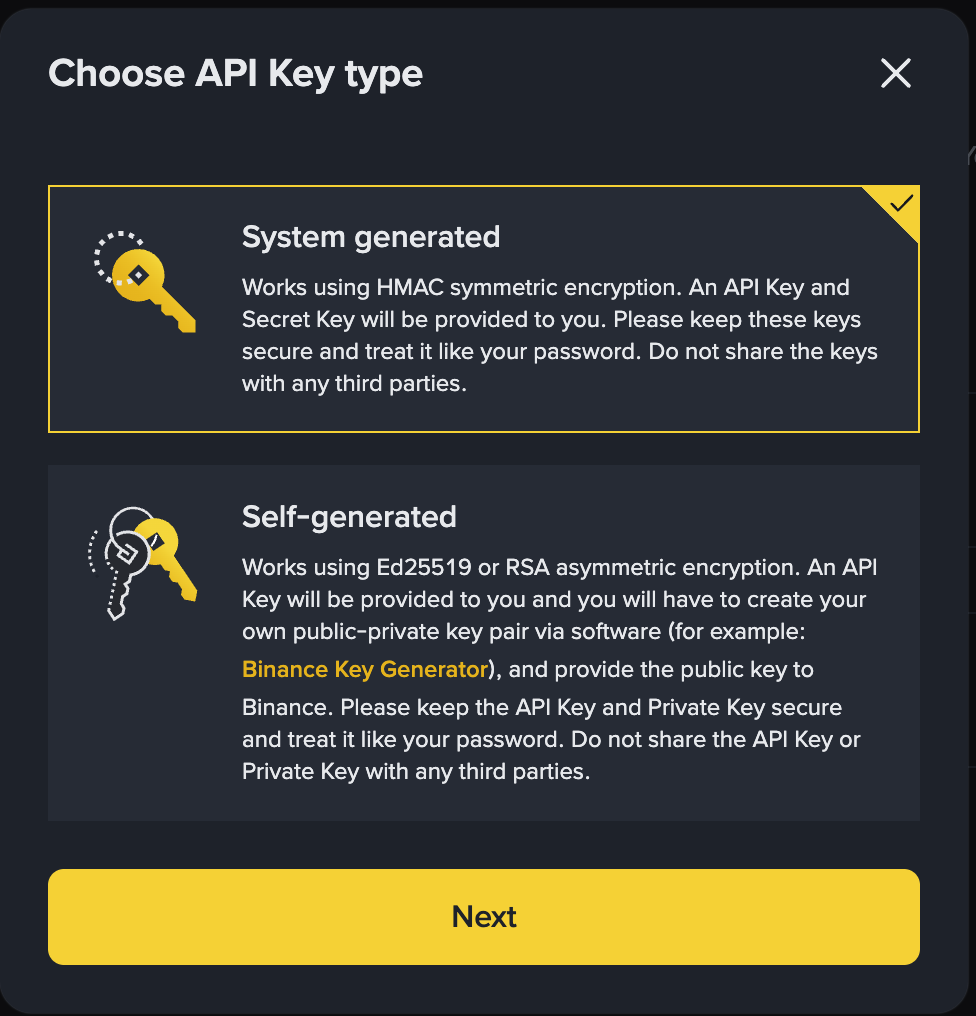
- Select the API key type: Binance will show you two options:
- “System Generated” ← CHOOSE THIS
- “Self-generated” (for advanced users)
- Leave the “System Generated” option selected (it is the default and recommended setting).
- Click on “Next”.
Step 3: Select the Sub-Account
- Choose the sub-account: A drop-down menu will appear with the list of your sub-accounts. Select the sub-account you created in the previous step (1.3). You will see the sub-account email in the list.
- Name the API key: There is a field called “API Label” or “API Name”. You can give a recognizable name, for example: “qPilot 1”, “API qPilot Bot1”. This name serves only to easily identify the key.
- Click on “Next” or “Continue”.
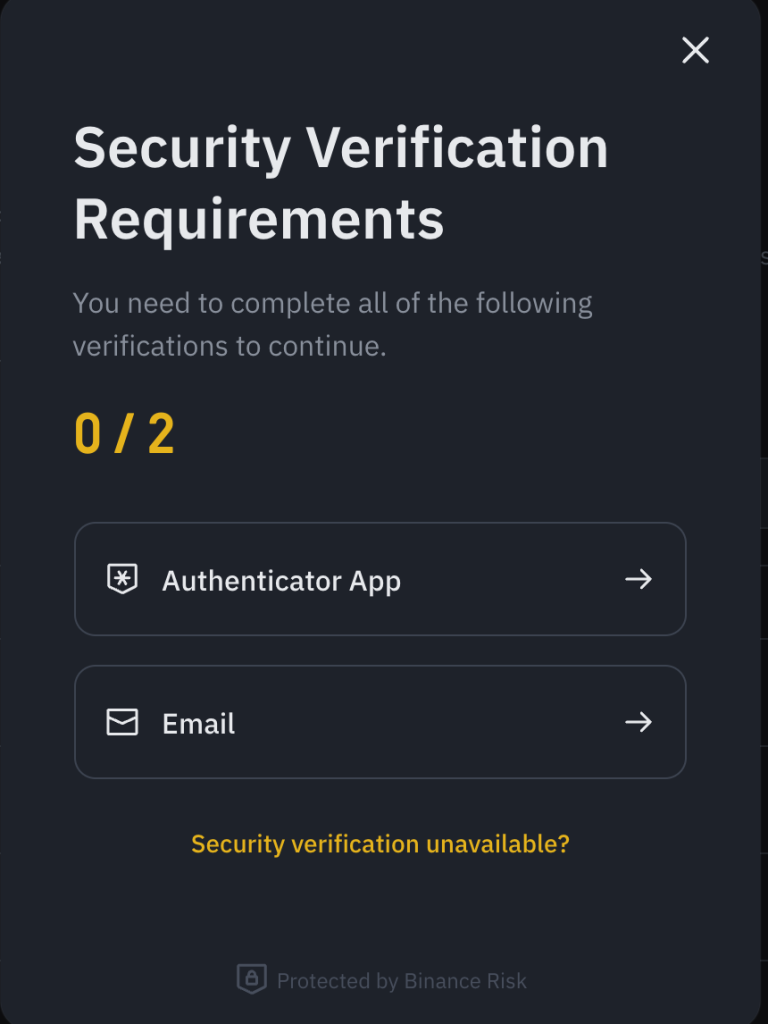
Step 4: Confirm with 2FA and Email
- Google Authenticator Verification:
- A window requiring the 2FA code will open.
- Open Google Authenticator on your phone.
- Find the 6-digit code under “Binance”.
- Enter the code in the Binance window.
- Remember: the code changes every 30 seconds, enter it quickly.
- Email Code Verification:
- After the 2FA code, Binance might also ask for verification via a code sent by email.
- Check the inbox of your main account email.
- You will find an email from Binance with a 6-digit code.
- Enter this code in the Binance window.
- Click on “Submit” or “Confirm”.
Step 5: Save API Keys The API keys have been created! Now you will see a screen with two very important keys:
- API Key:
- It is a long string of letters and numbers.
- Example format:
aBcD1234eFgH5678iJkL9012mNoPqRsT. - This key is always visible even later. You can copy it at any time.
- Secret Key:
- It is another long string of letters and numbers.
- Example format:
xYz987wVuT654sSrQp0mnLkJihGfEdCbA. - ATTENTION: This key is visible ONLY ONCE.
- If you close the page without copying it, you will no longer be able to see it. You will have to create new API keys from scratch.
CRITICAL STEP: DO NOT CLOSE THIS PAGE Before doing anything else, copy and save both keys:
- Copy API Key:
- Click on the “Copy” button next to the API Key or select all text and copy it.
- Paste it into a secure document.
- Copy Secret Key:
- Click on the “Copy” button next to the Secret Key or select all text and copy it.
- Paste it into the same secure document.
Sub-Account: your.email@gmail.com
API Key: [your API key]
Secret Key: [your secret key]
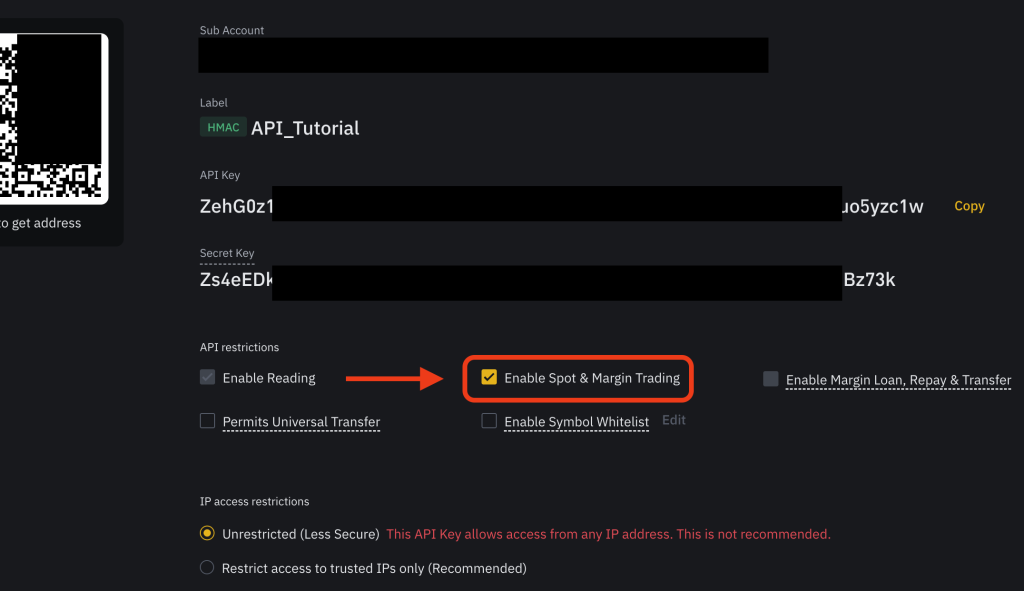
Creation Date: [today's date]Step 6: Enable Spot Trading
THIS IS A FUNDAMENTAL STEP FOR qPILOT
After saving the keys, before closing the page, you must enable trading permissions:
- Find the “API Permissions” or “API Key Settings” section.
- Scroll down the page if necessary. You will see several boxes to check.
- Check the “Enable Spot Trading” box:
- Look for “Enable Spot & Margin Trading”.
- Check ✓ this box.
- This is MANDATORY for qPilot.
- ATTENTION: Without this check, qPilot won’t be able to operate!
- DO NOT check other options:
- No need for “Withdrawals”
- No need for “Futures Trading”
- No need for “Margin”
- Only need “Spot Trading”
- Click on “Save”. You will find a button to save changes. Click on this button.
Step 7: Confirm Again After clicking “Save”, Binance will ask for security verifications again:
- Enter 2FA code:
- Open Google Authenticator.
- Copy the new 6-digit code.
- Enter it in the Binance window.
- Enter email code:
- Check your main email again.
- You will find a new code from Binance.
- Enter it in the window.
- Click on “Confirm”.