The sub-account is a secondary account linked to your main Binance account. Think of your main account as the “headquarters” and sub-accounts as “separate rooms” where you can organize different activities.
Why is a sub-account needed for qPilot?
- It separates qPilot operations from the rest of your activities.
- Greater security: if something goes wrong, your main account remains protected.
- Clearer management of qPilot performance.
- Each sub-account can follow only one strategy at a time.
What You Need to Know Before Starting Sub-Account Rules:
- Each sub-account has an email address different from your main account.
- Each sub-account has its own independent password.
- Funds must be deposited directly into the sub-account (no need to transfer from the main account).
- One sub-account = one qPilot strategy at a time.
Tip: For now, we will create just one. If you want to follow multiple stretegies in the future, you can repeat this procedure to create more sub-accounts.
What You Need Before starting, prepare:
- An email address different from your main account. You can use an email you already have or create a new one specifically (e.g., on Gmail).
- A secure password for the sub-account.
- The phone with Google Authenticator (for 2FA confirmations).
Step 1: Access Sub-Account Management
- Log in to your Binance account:
- Go to www.binance.com.
- Log in with your credentials.
- Enter the 2FA code from Google Authenticator.
- Open the side menu: Click on the profile icon at the top right.
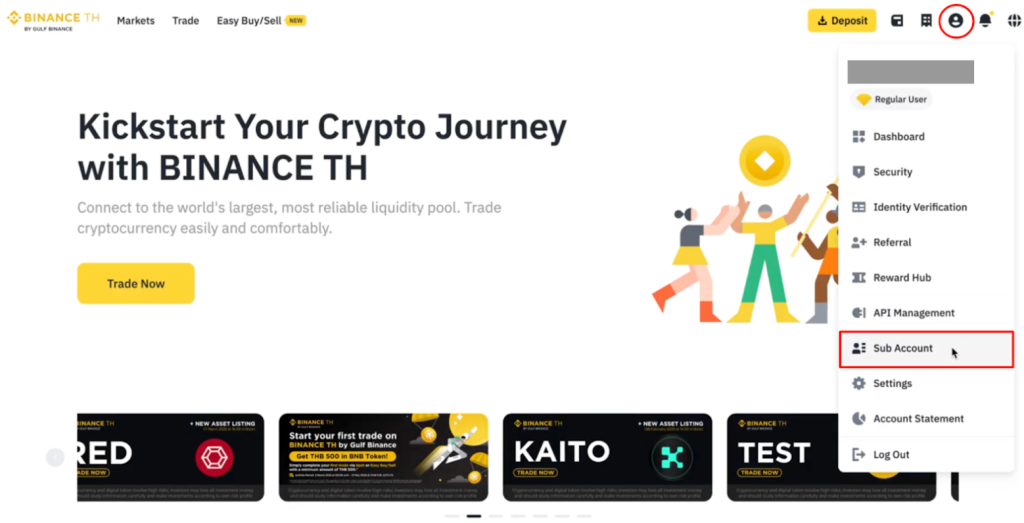
- Go to “Sub Accounts”: In the side menu, look for “Sub Accounts”.
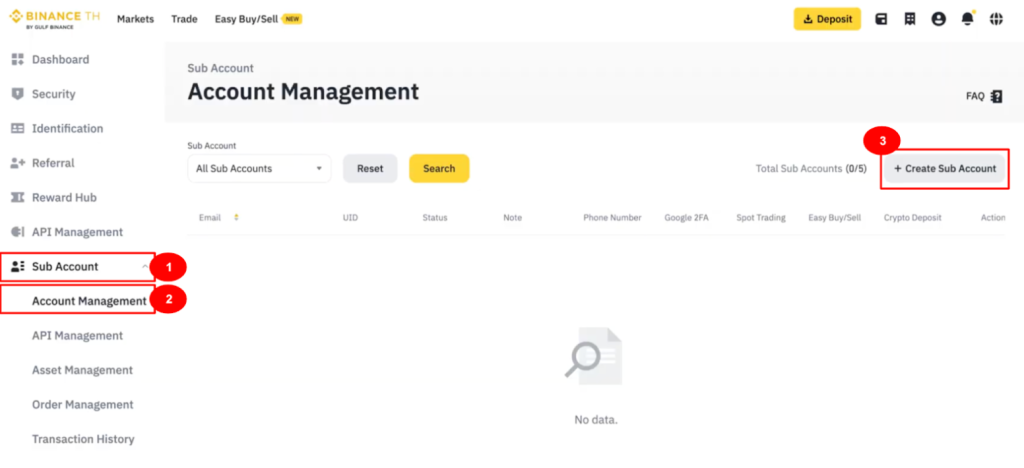
- Click on “Account Management”:
- A new page dedicated to sub-accounts will open.
- You will see an “Account Management” button.
- Click on this button.
Step 2: Create the Sub-Account
- Click on “Create Sub Account”:
- Look for the “Create Sub Account” or “+ Create Sub Account” button.
- It is usually located at the top right of the page.
- Choose the sub-account type:
- Binance will ask you how to create the sub-account.
- “Create with email” ← CHOOSE THIS OPTION
- Enter the sub-account email: In the “Email” field, enter an email address different from your main account.
- Create a password for the sub-account.
- Confirm the password:
- In the “Confirm password” field, enter the same password again.
- Make sure they match perfectly.
Step 3: Confirm Creation
- Click on “Create” or “Confirm”: After filling in all fields, click on the final button (usually named “Create”, “Confirm”, or “Proceed”).
- 2FA Verification: Binance will ask you to confirm the operation with Google Authenticator.
- A popup window will open.
- You will be asked to enter the 2FA code.
- Open Google Authenticator on your phone.
- Find the 6-digit code under “Binance”.
- Enter it in the Binance window.
- Click on “Confirm” or “Submit”.
- Email Confirmation: In addition to the 2FA code, Binance will send a verification code to your main account email.
- Check the inbox of your main email (the one used for login).
- You will find an email from Binance with a 6-digit code.
- Enter the code in the Binance window.
- Click on “Confirm”.
- Wait for confirmation:
- You will see a success message: “Sub-account created successfully”.
- The new sub-account will appear in your list of sub-accounts.
Important Notes
- Security:
- Save the sub-account credentials in a safe place (Email and Password).
- Do not share these credentials with anyone.
- Funds Management:
- The sub-account starts with zero balance.
- You can deposit funds directly into the sub-account or transfer funds from the main account.
- Multiple Sub-Accounts: You can repeat this procedure up to 4 times. Each sub-account will have a different email. Each sub-account can follow a different qPilot strategies.
Is this page helpful?